Tuesday, July 31, 2012

Some Wedding Pics...


...well, not from our wedding (don't worry- I'm sure I'll post some of those in September for our anniversary)... I just wanted to share some quick pictures from our cousin Amanda's wedding in June. A cousin of mine, Valerie Chappell Logan, along with her husband Ron, were actually her wedding photographers, and they did an awesome job!! I am including links to their Facebook page (Logan Photography) here, and their ordering website here.

They are so very talented, even if they are related to me! I already told Val I am definitely going to have to order the close-up of me & Zach, so I can't wait to get that in & get it framed! In this post, I am only including the pics with me & Zach, but if you're on Facebook, take the time to check out the other wedding photos & "Like" their page while you're at it. The other pics are so good! Wow!

And, I'm even going to include the "embarrassing" ones of us dancing. Sorry Zach...haha!

We had so much fun hanging out with family, and celebrating the day. I could NOT believe my sweetie got out on the dancefloor, but he did. I was so happy to have fun with him out there.

Congrats again, Amanda & David, and thanks so much Val for letting me post these here!

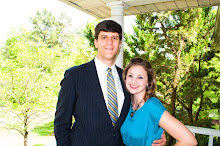
Love this close-up...


Same pic, just further away. He is just too handsome in his suit!...


The Jones fam boogeyin' down. Zach & I are cracking up! :) ...


Don't let Zach's look fool you- he had fun :) ...


Slow-dancing with my sweetie. I don't think we had slow-danced since our own wedding... Aww...


Hope you are all enjoying the start to your week! I will hopefully post soon on an organization project that I just fell into over the weekend. I got bored inside the house while Zach was outside pressure washing our driveway. It feels good to still be marking things off of our household projects list! I'll keep you updated!

Monday, July 30, 2012

The Quickest, Easiest Corn-on-the-Cob


This is a tip from my grandmother that I wanted to share, just because it's awesome! She had told me about this a few weeks ago, and warned me not to be skeptical, because she was when she first heard this tip. I took her advice, and thought I would try it out
for myself.

First, you gather your fresh corn, still in their husks...


You then cut off the stalk end...


Then on the other end, you pull the major part of the husk out,
or cut if off...


Place in microwave, still in husks (no plate or paper towel is needed, just place them directly on the surface)...


Cook for 4 minutes in microwave...


Wait and let them cool for about one minute, then bring them out of the microwave. Be super careful, because they are still hot, then easily remove the husks & silks.

You will be amazed at how easy all the silks slip off, and how perfectly moist the corn turns out to be!!


Now you're done! After 4 short minutes, the corn comes out perfectly- no pre-soaking, no wrapping with foil- just by cooking the corn in its own natural husk. Amazing!

My own personal favorite is still our grilled corn-on-the-cob, but this is a close second, and it's a time saver for those quick dinners.

******

Now, for confession time. I went to Hobby Lobby (ahem, in July... I know, it's awful that I can't go one month , but I failed by about 3 days), and got a few crafting things. I know that I am only accountable to myself in No-Spend July, but I was still a little disappointed. I reasoned the purchases out though (as I always do), because I knew that I wouldn't be making a trip there for a while, and had a few deadlines for projects coming up (I'm making a few gifts that I'm really excited about). I would rather have projects done than keep the No-Spend July going and not have any supplies. In the long run, I would be saving money because it would save me another trip. So, that's my confession.

Does it count if I haven't used any of the materials I purchased yet? I may wait until August, just to make myself feel better. Oh well. :)

My sweetie & I enjoyed the day Saturday with a little day out & watching Dark Knight Rises. Wow, was it good!! I highly recommend watching it!

On Sunday, we had a great morning at church & then rested most of the afternoon. Later that day, Zach went outside to work and I went to the basement to craft. We are doing well with getting a lot done on the weekends, so I hope we can keep that up.

I snapped a few pics of the babies over the weekend,
so I'll end with those. :)


Thursday, July 26, 2012

"Fat-Burning" Veggie Soup


I hope you're all having a good week so far- it's almost done! I think my sweetie is going to take me to see Dark Knight this weekend, so that's something to look forward to. I love having get-away days! And I would LOVE to squeeze in a trip to Hob Lob too, but I know I can hang in there just one more weekend. This No-Spend July is killing me, and I've even been more lenient on myself this year compared to last year, "allowing" myself to buy clothes...
but, it's still killing me.

So, this is one of those "so-called fat-burning" recipes. And I can tell you how it burns fat- I think I burned 10,000 calories just by chopping up all the veggies for this recipe!

 I got the recipe here, from All Recipes. It is just a basic veggie soup, with virtually no fat. It is comprised of all veggies (I have read you can pick & choose other veggies to include/exclude, just not potatoes or beans.) I am definitely a soup girl & I love almost all veggies, so this was right up my alley. It makes SO much- I gave a batch to my mom, stocked some in my freezer, and still have plenty left. I hope to keep it stocked up, especially
for Fall & Winter coming up.

Here's what you'll need for the soup (this makes 15 servings):

- 5 carrots, chopped
- 3 large onions, chopped (it's a lot!)
- 2 16 oz. cans whole peeled tomatoes with liquid 
(I just used one big can)
- 1 large head cabbage, chopped or shredded
- 2 green bell peppers, diced
- 10 stalks of celery, chopped
- 1 15 oz. can of green beans (the only bean you can use)
- 1 1 oz. envelope of onion soup mix
- 2 qts. tomato juice (I used V8 for even more veggies)
- 1 14 oz. can beef broth


After you gather all of your ingredients, you then waste your life away chopping them all. :)

Once chopped, I added them all into one big pot.

First, the carrots...


Then, the onion...fun!...It really wasn't that bad with my little chopper...


Then, pour in the tomatoes with the liquid...


Then the cabbage, which I just shredded instead of chopped...


Next, the bell peppers...


And the chopped celery...


Add the can of green beans next (I forgot and included the juice anyway, but I love a lot of broth, so it worked out)...


 After all veggies are simmering in the pot, add the envelope of onion soup mix...


Then, add the 2 qts. of tomato juice, or in my case, V8.


Finally, add the can of beef broth...


And, since I love a lot of broth, I added about 3 beef bouillon cubes along with the 3 cups of water to the mix. The recipe also says to add enough water to cover the veggies, which is not much.


You just cook the soup until all veggies are tender. The recipe actually stated it took 25 minutes to fully cook, but that was not the case with mine. I let mine simmer about 45 minutes.

And here's my finished product simmering away...


Monday, July 23, 2012

$1.50 Kitchen Soap Stand- Thanks, Pinterest!


Well, we had a GREAT weekend! Every day had something planned, which I love! We kicked the weekend off right by me & my mom & some great friends of ours going to a play at our local community college. It was wonderful!! It amazes me each time I see a play there just how much talent we have in our little area!

On Saturday, my mom, grandmother & I went shopping, and all three of us found some awesome bargains! I only bought clothes, and we didn't even step foot in their Hob Lob...it's killing me not getting to go to my favorite store, but I can make it- only one more week to go until August!! On Sunday, church was great as always, and we ended the day by cleaning our front porch, just as we did with our back deck last weekend. The front door, porch railings, columns & spindles are all now sparkling white!

So, for my post (that I am very excited about)...

I guess this little project post will be the first in a series of Pinterest-related posts, entitled Thanks, Pinterest! I have gotten into a habit lately of grabbing up my iPhone right before bed, and ending up wasting an hour (or more) on Pinterest. I go straight to the DIY & Crafts category, and begin drooling at all of the crafty pins. Since the beginning of this little obsession, I have created several new boards, including but not limited to, "Painting", "Mod Podge Love" and "Crafty Ideas".

The pin featured here was one of the first pins that I knew I wanted to re-create...I'm including the original link here. The originating website of the pin is here. Bless this girl for thinking this up, because it is a great idea!

We have always kept our brush, dish soap & hand soap along the rim of our sink. There have been countless times when I have either knocked one or all of these into the sink, and/or come close to making them a victim of the garbage disposal. With this handy-dandy soap stand, I won't have to worry about that anymore. Now they have their own little home, and the sink rim is
now free from clutter!

I actually had this pin in the back of my mind, and while at a thrift store stop one day (before No-Spend July began), I found exactly what I needed for the project...

A tray for $1.00...


...and a candlestick for 50 cents...


 The pin shows to grab up the two items and coat with spray paint (which is the fun part!), then glue them together. I used my E6000 glue for extra strength.


Complete the look with maybe a pretty, colorful dishtowel, and place your dish soap & brush in their new home- you're done!

I can't believe this little handy project only cost $1.50, not including the spray paint & glue I already had. Even if you include those in the cost calculation, it's still totally cheap & totally worth it! No more soap scum build-up on the rim, and no more brushes falling into the sink.

This will be especially handy when we have our new stainless steel sink installed. (I really wanted to wait and post this project until after we installed our new sink, but I couldn't wait any longer!)

A quick Before & After...

BEFORE 


AFTER


I think it looks great with a dishtowel to add color too...


 ...but I like it better without...


Stay tuned (possibly tomorrow), because I have a soup recipe that I tried over the weekend to share, and it's a good one!

Wednesday, July 18, 2012

I'm Moving Out!!


Hope I didn't scare anyone! I'm only moving into the basement... not to live, but to craft. Everything is great around here! :)

I'll save those of you who don't want to read all about it, and post my pics first. Keep in mind, this is the first stage of my new hang-out. This is basically a pic of right after the brief clean-up, and after I've moved some of my things downstairs and attempted to organize some of it. I think it's one of those places where I'll need to work in it first to see if any tweaks need to be made, and if anything needs to be moved around. Or, it may be perfect the way it is now...we'll see!

I am loving putting to use this vintage Coca-Cola crate from my grandmother's! It still has all of the compartments, so it keeps all of my paints & supplies separate.


I am also putting to use my little painted chalkboard tray.
This will be a good way to keep my list of projects-in-working-order handy.


To give you an idea of what this area looked like
before I got started...

This pic shows the table with some of my crafting goodies, right after I moved them to the basement...I know- yikes!...


The table, now cleaned off...getting a little better now...


I found this awesome shelf paper at Dollar General. I had to have this cute black & white pattern!


It was so easy to apply, and now I have a cute, covered workspace...


I found the perfect place for my little knob that I scored super cheap at Hob Lob. I plan on using it to hang my ribbons...


Part of my spray paint collection is now in a neat organizer from
the Dollar Tree (Keep in mind- all these items were already purchased. I'm still sticking to No-Spend July)...


I used the few nails & hooks that were already up to hang my wreath forms & tape. My sweetie is going to help me install more soon...


I also used cheap-o baskets from Dollar Tree for more quick organizing. I already had these too!


 These water & juice jars are also from my grandmother's. They will be used for rinsing water when I'm painting...


It is totally crazy to think that my new favorite hang-out is our basement, but it is. I never would have thought to take this place-that-I-never-think-about-and-don't-want-to-think-about and turn it into a place-that-I-want-to-spend-my-time-in-ALL-the-time. And it was all my sweetie's idea- he gets all the credit for this one. I did do a lot of the work in the transformation process, but it never would have happened if he hadn't suggested the basement
as my new crafting "lair".

It is so practical, too. I have been wanting a place to permanently house my crafting accoutrements. For the past year, just since I've really gotten into crafting, I've used our kitchen table for that. Not a very good use of our table, and plus, I miss having a face-to-face meal at home with my sweetie. Not that we don't have a (very nice) heirloom dining room table for that, but we never use that when it's just the two of us. So, it was time to start thinking of
other options.

I had the idea of maybe moving my computer desk from the living room corner to our guest room, and making that my crafting area. Two negatives in that: 1.) we kinda' need the desk in the living room, to fill up the corner that it's in, and 2.) we don't really have the room to squeeze it into our guest room. So, I kept thinking,
but to no avail.

Then, came the day when Zach just casually mentioned in conversation the idea of using a part of the basement. It was one of those moments where the little light bulb must have appeared above our heads. It was a brilliant idea. Yes, brilliant-
I don't use that word often enough.

It is actually very comfortable year-round- not really hot or cold, just an in-between comfortable. Zach also still has to have his area of the basement. He needs it for all of the yard stuff- mower, leaf blower, weed eater, etc. Those things take up a lot of room. And, we also have the shelves (it is SO wonderful to have shelving in our basement) that are occupied by many a plastic bin, filled with things from our childhood bedrooms, Christmas things,
and others.

For the move, I started the organization of the set-up by first carrying my little copper pails down to the basement
with me...


...and it just blossomed from there!

 I then was able to clean out a huge chunk of the guest room floor, piece by piece, by taking things to the basement. Everything else left in the guest room now (besides the furniture!) is yard sale-ready. Woohoo!

I am so happy I was able to revamp this area and make it look not-so-basement-like. There is not much you can do without dipping into a lot of cash, so I'm not too concerned about it just yet. I am just so very excited that I now have a place to unwind, focus on my crafting & creating, and be away from the noise of the house. I know Zach's happy not having to look at all of my paints & brushes & glues, and everything else I have accumulated
over the last year or so.

A few ideas I have for this crafting area swirling around in my head so far include:

- A Pinterest craft checklist hung up
- Several more hooks & knobs hung on the pegboard
- A separate painting area and hot-gluing area- (already working on this one)

I am really hoping that my creativity will flow freely in this new area. Being away from the TV has gotta' help! I carry my iPhone down with me, so I have my music. Now, every time I see something in the house that I could use for a craft, I will go ahead and set it aside to take with me on my next trip to the basement. That way, I can hopefully start dwindling down my collection of knick-knacks above-ground.

A less cluttery home is a happy home. :)

Oh, and speaking of clutter- we now have a clean kitchen table...


...(ahem)... that we still won't use. :)
Related Posts Plugin for WordPress, Blogger...