

Wow! What a great weekend we had!! Me & my sweetie went yard-saling Saturday morning, and found a few little things. Then that night, I had a blast with some awesome ladies from our church women's group at the Vaudeville Cafe Murder Mystery Dinner Theater- and it didn't hurt that we went shopping & hit Krispy Kreme on the way home. We had a great time together! I also made it through our trio song on Sunday morning. Yay! It was a blessing to have the privelege of singing with two very talented friends, Miranda & Dr. Roger. God is good!!
So, this post shows a project re-do. I was not happy with the results of my original project, the Ballard Designs Laundry Letters Knock-Off, so I decided to take it apart and do something different. They did closely resemble the Ballard Designs' look that I was wanting to achieve, but I just didn't like the look of it anymore. You've gotta' change things up every now & then, especially if you're just not happy with it or you're tired of it. It also took up a lot of space on the top of our storage cabinet in the laundry room,
and I just wasn't having that.
I am so much happier with this second end result- the white in the first version was just too bland, and I didn't like having the letters all together like they were. So, do they look better now or the way they were before?...I know what my favorite is,
but you can be the judge.
but you can be the judge.
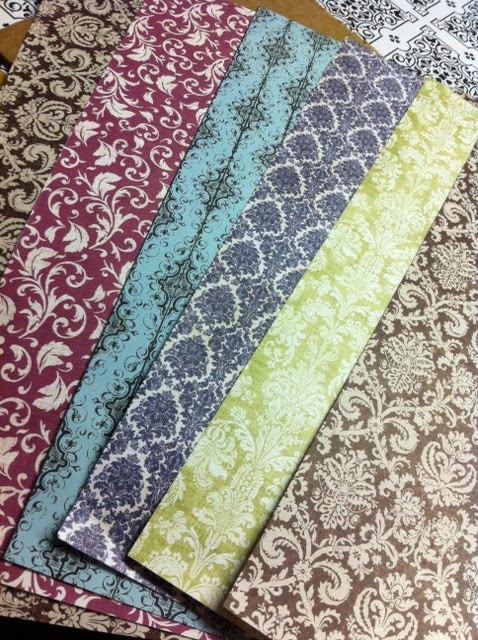
I started by taking the letters off of the wooden "stand" that I created. I was able to remove the hot glue fairly easily, by just scraping it off. Next, I was definitely tired of the plain, bland white, so I wanted to add a little more color. I went to Hobby Lobby and got the scrapbook paper, and began cutting away. (This was one of the items I squeezed in at the end of my No-Spend July.) I am just in love with their decorative paper selection. I probably spent 20 minutes in that aisle alone, just going through the pretty designs. As you can see, I am in love with damask- in any color. I thought these colors went well together, and they tie in the colors in our laundry room wall border.

I got a piece of cardboard to use as my table cover (I learned the hard way that you need something to protect your surface if you're going to start carving away with an X-acto knife).
I simply traced the letters.

I made the outline a little bigger, just to allow room for error.


I got a piece of cardboard to use as my table cover (I learned the hard way that you need something to protect your surface if you're going to start carving away with an X-acto knife).
I simply traced the letters.

I made the outline a little bigger, just to allow room for error.


I made sure they matched up closely, then grabbed up my Mod Podge and a good foam brush. (I just noticed these next pics have totally different lighting- that's the difference in the fluorescents in the basement & the soft lighting in the kitchen. Crazy!)

I Mod Podged the letters, then carefully spread the scrapbook paper out on top. After letting it dry for a full day, I then brushed Mod Podge on top of the paper to seal. I sand-papered the edges to rub off the excess paper.


I didn't realize until I started cutting that I had (subconsciously) picked out a red pattern for my "A." I am SO ready for football season!! Roll Tide!!


The letters are so light-weight (they also came from Hob Lob), so I was able to hang them up with poster tack. Yay for no holes in the wall and easy hang up!

Here they are in their new home, on the wall of our
laundry room...

laundry room...


And here's a Before & After...
BEFORE

AFTER

They really add a pop of color to this once-bare wall, and we now have extra storage on top of our cabinet.
Hope you all have a great rest of the week! We are ready to see one of our favorite comedians, James Gregory, who will be in our little city this Friday. It's always great to have something
to look forward to!


I love the fun fabric you used for your letters...very cheery!
ReplyDeleteI love these!!!! I may do something like this for our daughter's room.
ReplyDeleteWhat a really cute idea, and love how you staggered them on the wall which gave them more interest. Also love the fabric you used. Looking good! Thanks for sharing your creative inspiration with Sunday’s Best – you helped make the party a success!
ReplyDeleteThey look great!
ReplyDeleteThanks for linking to a Round Tuit!
Hope you have a fabulous weekend!
Jill @ Creating my way to Success
http://www.jembellish.blogspot.com/
uşak
ReplyDeletevan
hakkari
elazığ
bingöl
P63718
sivas evden eve nakliyat
ReplyDeleteerzurum evden eve nakliyat
bitlis evden eve nakliyat
mardin evden eve nakliyat
rize evden eve nakliyat
AK7A5
adana evden eve nakliyat
ReplyDeletebolu evden eve nakliyat
diyarbakır evden eve nakliyat
sinop evden eve nakliyat
kilis evden eve nakliyat
KLPL
165B8
ReplyDeleteTokat Lojistik
Yenimahalle Parke Ustası
Ort Coin Hangi Borsada
Tekirdağ Boya Ustası
Bitlis Şehir İçi Nakliyat
Manisa Lojistik
Mersin Evden Eve Nakliyat
Mefa Coin Hangi Borsada
Çerkezköy Koltuk Kaplama
A72E7
ReplyDeleteHakkari Şehirler Arası Nakliyat
Çankırı Parça Eşya Taşıma
Nevşehir Şehirler Arası Nakliyat
Pursaklar Boya Ustası
Mardin Evden Eve Nakliyat
Iğdır Şehirler Arası Nakliyat
Samsun Şehirler Arası Nakliyat
Mersin Parça Eşya Taşıma
Ardahan Evden Eve Nakliyat
D7AAC
ReplyDeletekırklareli görüntülü sohbet kadınlarla
canli sohbet
yozgat rastgele görüntülü sohbet uygulamaları
yabancı sohbet
goruntulu sohbet
konya görüntülü sohbet kızlarla
ücretsiz görüntülü sohbet
çanakkale en iyi ücretsiz sohbet siteleri
düzce sesli sohbet siteleri
0F3A2
ReplyDeleteçankırı görüntülü sohbet odaları
kütahya rastgele canlı sohbet
sesli sohbet siteleri
şırnak random görüntülü sohbet
nevşehir kadınlarla sohbet
sesli sohbet sitesi
adana canlı sohbet siteleri ücretsiz
burdur sohbet
canlı ücretsiz sohbet
8935F
ReplyDeleteBitcoin Nasıl Kazanılır
Bitcoin Kazanma
Meta Coin Hangi Borsada
Kripto Para Çıkarma
Telcoin Coin Hangi Borsada
Mith Coin Hangi Borsada
Facebook Grup Üyesi Hilesi
Nonolive Takipçi Satın Al
Referans Kimliği Nedir
85BAB
ReplyDeleteClubhouse Takipçi Satın Al
Spotify Dinlenme Hilesi
Spotify Takipçi Satın Al
Anc Coin Hangi Borsada
Xcn Coin Hangi Borsada
Bitranium Coin Hangi Borsada
Binance Referans Kodu
Parasız Görüntülü Sohbet
Bitcoin Nasıl Kazılır
A70C766CBD
ReplyDeletetürk aktif takipçi
9A16F53FB5
ReplyDeletetiktok turk takipci satin alma
1ABC7013D2
ReplyDeletemobil ödeme takipçi al
F6FDB47B78
ReplyDeleteAnadoluslot
Anadoluslot
Anadoluslot Yeni Adres
Anadoluslot Yeni Adres
Trwin
Trwin
Trwin
Trwin Güncel Adres
Trwin
39E9344AC9
ReplyDeleteinstagram telafili takipçi
begeni satin al
fake takipçi
twitter takipçi
ucuz takipçi
6643ED47B5
ReplyDeletemmorpg oyunlar
sms onay
güvenilir mobil bozum
takipçi satın alma
-