Wednesday, February 15, 2012

Quick Favor, Pretty Please!


I can't believe this little blog has almost reached 100 followers- and it's growing every day! In an effort to try to consolidate all you lovely people into one group, I am including a link in this post to the new Linky Followers tool here.

Google Friend Connect is also phasing itself out (which I have two of these GFC groups, because of having two email addresses linked up- you can see these in the left-hand pane of this blog), so Linky Followers will be taking the place of it on March 1st.

It would be awesome if you could simply move followers from GFC automatically (and not lose any!), but that's not the case. Therefore, I would appreciate it if you would pass the word along!

To make it simple, you can just click the blue "Follow Me" link on the left-hand pane of this blog, right below the "I Was Featured" section. You can also click on the "Linky Follower's" link, under my current list of subscribers, to be directed to their site.

Once at the site, you will be prompted to log in/create account. This takes 2 seconds & is FREE. (I promise- and I am more skeptical of sites than anyone!) Once your account is created, you can add & manage all the wonderful sites you want to keep up with. You can also register your own site or blog.

I want to encourage everyone to join in- no one wants to lose current followers!

Thanks so much!

V-Day #11


This Valentine's Day was our ELEVENTH together!!
That is absolutely unbelievable to me!
Each one is better than the one before! :)

To start out the week on Sunday, we spent the day in Cnooga. We got to visit with Zach's mom for a while, shopped a little, and went to the movies. Then, on Monday night, I went to the movies with the girls to see The Vow. Oh, it was so good!

Then, on V-Day, Zach woke me up to give me my gift. He was more excited about it than I was- he kept asking me all last week if I didn't want to open it early. Let me just say that I was very excited right off the bat when I saw the little box it came in...


 Inside was a beautiful bracelet! I was so surprised! My sweetie totally outdid himself!! We rarely spend on each other- a lot of Christmases, we just saved our money & used it for things we actually needed around the house or for something we both wanted. I am still telling him he did way too much this year. I'm going to have to pull out all the stops for his b-day, that's for sure!

That night, Zach & I went to our local country club & had a yummy dinner of prime rib. We had a great time!

I know every day should be Valentine's Day. I've always thought it was a silly holiday- whether you're single or with someone. I want Zach to always know, every day, that I love him & that I'm so proud of the man he is. I don't deserve him, but I'm thankful that God chose me to be his wife. He continually blessed our relationship while dating, and He still continues to bless our marriage, every day.

So, for a real Valentine's Day meaning, I found this little gem on a visit to the site here, Uncommon Designs Online.

For God so loVed the world
That He gAve
His onLy
BegottEn
SoN
ThaT whosoever
Believeth In Him
Should Not perish
But have evErlasting life.

John 3:16


He gave us the ultimate Valentine's gift, and I hope we'll always remember that. Jewelry, flowers & cards will fade away & tarnish, but that gift won't.

Monday, February 13, 2012

New Year's Goals Follow-Up... Already


For my own benefit, I wanted to post a follow-up on my New Year's Goals...and I know, it's just February. I don't want to jinx myself, but I do want to keep up with my "progress"...or lack thereof. So far, I really feel like I have started off on the right foot with this little list. Even though I'm only a month into it, I am hoping I have gotten the momentum started, and that I will keep it going throughout the year. It may also be that we're just getting back from vacation, so I may just be feeding off of that relaxed, refreshed feeling.

Either way, something's working thus far. :)

Here goes...


1.) Be happy. I really am happier. I think it's a culmination of doing some of these other things on the list & lots of time to heal from the past year, but I really feel like I am.

2.) Pray more. I am working on this, so I'm not marking it off yet.

3.) Exercise more, and have FUN with it. I got up a few Saturday mornings and ran. I LOVED it!! It has been freezing cold, but I would get up out of bed, bundle up & hit the neighborhood. One recent Sunday afternoon, Zach & I took both dogs for a walk around the neighborhood. But, I can't seem to find the time to do much of this during the week. It is dark outside when I get home from work. I do want to start using our Wii more for exercise. It's not used enough. So, that is why this item is halfway marked off. :)

4.) Focus even less on the things that don't matter. Focus even more on the things that do. Here again, another halfway marked one. I really am focusing more on the good things in life. I am trying to spend more time with my sweetie. All we have together during the week are a couple of lunches & weeknights, and lately he has been taking off from work right when I get home. He is still very busy at this time of the year (praise the Lord for that!), but he is taking a break at night, which is good for both of us. We have been catching up on Netflix & relaxing, which is definitely a good thing.

5.) Surround myself with positives- positive people, positive thoughts. Still working on this.

6.) Blog more. This has easily been accomplished! I am spending less & less time on FB, and focusing more on blogs- my own & others'. I have already made many blogger friends in the past few weeks, and hope to keep that list growing!

7.) Try more new recipes. Done! I have tried a few new ones in the past weeks (they have all been good, but not any that just blew us away- still looking for that one)!

8.) More home improvements- anything to make our home better. My sweetie has already accomplished two big things (well, big to us) around the house. All it took was a quick trip to Lowe's & a few minutes of work. I stayed away. He replaced two switches in our kitchen, and we now have a perfectly-working disposal & light above our sink. Before his little handywork, the light would flip on only occassionally, and the disposal would come on sporadically. I have started a list of things we want done, and we hope to start marking things off (more on that in the final paragraph of this post). 

9.) More projects in general. I SO want to mark this one off. I have a project or two that I will do soon, but because of me working on #4 so much more, I don't have the time for projects during the week. Vacation has gotten me missing projects even more, so we'll see. 

10.) Spend less on nothing. I could not tell you the last time I stepped foot in a thrift store. I have, however, been shopping the last two weekends before the trip (mainly because we went out of town both weekends for my birthday, and I can't go out of town & not shop). BUT, I only used gift cards for my purchases. Go me!! I am not planning on shopping any more any time soon, just because I have projects still left to be done, and I can't keep piling things up in our guest room. Also, I realized the other day how many sweet friends of mine will be having babies very soon, and Miss Sheena will be tying the knot in just a few short months! This gal will be busy spending on wedding & baby gifts!


I am really happy when I look back at this list. If you know me, you know I LOVE to make lists. I love even more marking things off of said lists. I make lists even for small things, just so I can mark things off of them easily. At any given time, I will have 3 or 4 post-its or pieces of scrap paper in my purse with "important" lists on them. I have found that it just works for me. I have recently bought a cute little "J" notepad that I am keeping my lists in. This helps with #8- the house is cleaner without my little notes scattered everywhere. :)

Hope everyone had a great weekend &
Happy (Early) Valentine's Day!!

Tuesday, February 7, 2012

Back From Aruba!


We're back (unfortunately)!

This was my view every day for the last week...


Ugh, and I miss it so much!! We did absolutely nothing for a full
6 1/2 days, and it was wonderful! We really enjoyed Aruba's awesome breeze. The food was indescribable (but pricey) too! We would lay out, either in the sun (which didn't last very long), or under our palapa in the shade every day. We both came home with pretty good tans. We enjoyed the swimming pool & lazy river, and thoroughly enjoyed a virgin strawberry daiquiri here & there (they're much sweeter without alcohol- plus, that's something you really don't need while out in the super hot sun).

I took fewer pics on this trip than I think I ever have on a vacay
(I sound like a spoiled brat here, but it's just nowhere near as beautiful as Maui), but I will post some of them soon. Zach took some good sunset shots too. We ended up with just one pic of us for the entire trip, but that's ok. We have tons more from other trips, and we're already talking about another Disney trip. :)

We both loved our little break from reality. A break from work, housework and (probably most importantly) a break from connections. The internet is a great way to keep in touch, but we all seem to use it as a crutch nowadays. It is always there, within arms' reach, so it's always nice to set it aside for a while. Breaks from Facebook are one of my favorite things about our weekends. This vacation was like one long, sunny, fun, relaxing weekend.

So, the week before we left, I wanted to use up & cook food we already had, since we made it a point to not go to any store (grocery store or Wal-Mart) that week- and we actually did it! I tried this recipe, and we LOVED it! I know it couldn't have compared to some of the Greek food that Zach has had before- he is half Greek, has been to Greece once, and his Papou (grandfather) lived right next to an awesome, authentic Greek restaurant. But, it was still very good.

I got the recipe from this site, and (in typical Ashley fashion) tweaked it a little.

-Greek Oven Potatoes-

- 5-6 potatoes (I didn't peel them)
- 1/2 cup olive oil
- juice from 2 lemons
- 1/2 cup chicken broth
- salt/pepper to taste
- 1 tsp. oregano

Peel potatoes (I didn't), cut (I'll also cut bigger chunks instead of strips next time). Coat with olive oil, lemon juice & chicken broth. Sprinkle with salt, pepper & oregano. I also added a pinch of garlic powder in there- we love that stuff! Toss to coat. Put in roasting pan/deep baking dish, and roast at 400 degrees for about an hour. I also saw one other recipe where you can roast at 450 for about 40 minutes, but I think the lower the temp. & the longer you cook them, the more tender & flavorful they are.

I got a little camera happy while making these (I was simultaneously preparing these for the oven & painting top coats on my rooster table), so here goes...

Ingredients

Potatoes with salt & pepper

Coated with juices & oregano


 Right out of the oven

Our yummy plate of baked flounder, potatoes & lima beans

I hope everyone has a great weekend! I have been washing clothes like a mad woman these past couple of days, but we came home to a clean house, so that's one less thing I have to do now.

I guess we will spend our weekend resting & spending time with our doggies. We missed them so much while we were gone! It's so much fun to go to the vet & pick them up when we get back. They're always super sweet & cuddly the first day or so, but then they're back to their normal selves (Daisy being mischievous & Cosmo being nonchalant).

Life is good right now in the Jones household. :) 

Wednesday, January 25, 2012

Rooster Table Re-Do


Ok, just a little preface before we get started. First of all, I was almost about to title this post Cocka-Doodle-DON'T, but I didn't. That may be too cheesy, even for me. Also, this is sad, but I admit- this table revamp began as a "No Spend July" project- the date on this post's draft is 7/5/11. Isn't that sad?? I first sanded & painted it (the hard parts), then it sat, and sat, and sat, and I didn't touch it for months. Until just this weekend (which was one of the most productive weekends ever!), and it only took a few minutes to finish.
Oh well, now that that's out of the way... :)

I am so excited about the way this table turned out that I am going to commit a cardinal sin & post my After picture first off.
I can't wait any longer!


Oh, I love it!! Now, for the details...

If you do love roosters, I apologize in advance. They just don't go with the design in our house.

Oh, me. This ugly little rooster table...

BEFORE


...was purchased at a resale shop in Birmingham. I was desperate for a small table to place a plant on that had nowhere else to go.
I knew the plant would cover up the lovely rooster, so I didn't worry about it. I loved the design around the edge, which is the only part that shows. But, now that I've gotten more into painting, I thought this would be the perfect, cheap piece to practice on.
If I ruined it...well, it couldn't get much worse.

I waited a while at first, because it was WAY too hot outside to spray paint. (As I said before, this was another No-Spend July project that I'm just now getting around to finishing.) I also had some stencils that I wanted to use on something. This was finally the project for them, and I LOVE how it turned out!!

AFTER (in steps)

I started by sanding away. The poor little rooster became a faint picture in a hurry. Yay!


Then, I spray painted it with red paint (cheap-o from Dollar General) all over the smoothed surface. This shows it after just one coat:


I didn't bother to cover the legs before I painted- I sanded them off after painting, and they looked just as before, with a little red mixed in to tie the color of the legs & table together. I then sanded over the tabletop a little to smoothe it out even more, then sprayed one more coat of the pretty red.


(The above pic shows it on a different day than the previous one, so the bright sun makes the red look differently.)

*Sidenote: After this step, I brought the table back inside the house and stupidly placed the plant back on it until I could get around to the stenciling. A few days later when I was ready to stencil, I picked up the plant and noticed the grooves on the bottom of the pot had made indentions on the painted tabletop. Ugh!! I can't explain how frustrated I was. I took the table back outside, sanded & painted again, but it never looked the same after that. The surface is still uneven, which kills my perfectionist self, but I got over it. I have to let go of that when I paint. No one will ever notice details like that but me. So, this time, I got over it and just began the next step... after a few months had passed, that is. :)

After bringing the table back inside, it did sit for many months- July to January, to be exact. I guess I just wasn't in the mood to finish it up. Weird how one day month you can be excited about a project, then the next, you just lose interest. Anyway, it's done now, and that's what matters...

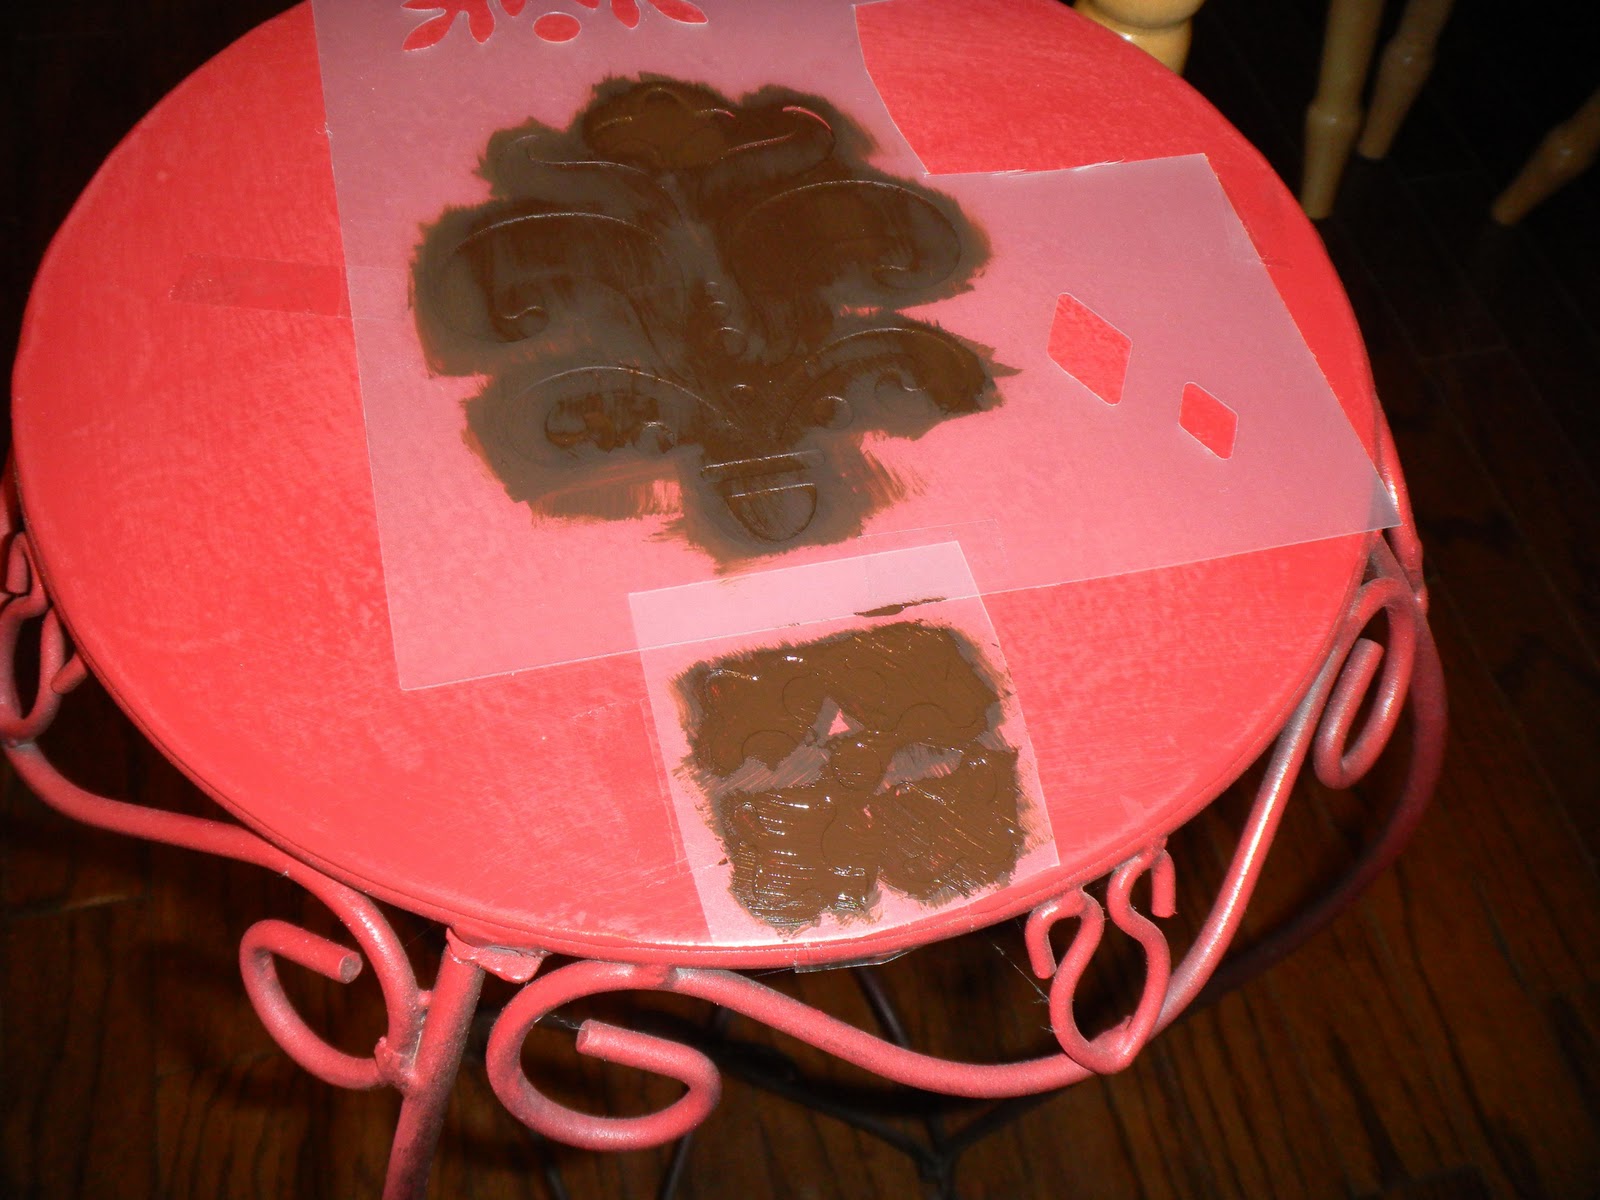
I sanded the top again, just to make a better surface for the acrylic paint. Next, I used the stencils. I taped them along the edges, and used brown acrylic paint to paint inside the stencils. I love the center design so much, I don't want to cover it back up with the plant. I guess we're back to square one now, trying to find a new home for the plant. Ha!

Here are some photos of the steps. Some look a little rough, but they were all steps to get to the finished product.

First coat with stencil...


Second coats with center stencil & edge stencil...


Working my way around with the stencils & two coats on each...
I know the red looks rough since I sanded it, but no worries- it turned out beautifully!


This shows the first coat of Mod Podge drying, while I sanded some of the red paint off of the legs.


I posted this pic in black & white, because it better shows the coverage of the Mod Podge. This is just after the first coat. I did a few more after this one, just for good measure.


Here's a close-up shot of the detail...


I did several top coats of Mod Podge, because I knew I would have a plant (with water) on top of this table. I wanted lots of protection for this baby. The only thing I may change is sanding the legs a bit more. Other than that, I'm so happy about my second time ever to paint furniture! (You can see my first here.)

So, a quick Before & After for the lazies who don't want to keep scrolling back & forth (myself included):

BEFORE


AFTER


Bye-bye, birdy! :)

Linking this up to...


...and many others!

Tuesday, January 24, 2012

"Pinspirations"- Winter Edition


So, I have been hooked on Pinterest for a while now. I love it at any time, but I especially loved it during the Christmas season. I have gathered so many crafty ideas from it. It is such an easy way to share, and I love having a visual on everything. Here, I'm going to share with you three little ideas from Pinterest that I tried.
If you like one, pass it along. It's so fun to share these ideas!

It was a little late at the time I started some of my Christmas crafts, but that's how it is around our house. I don't work on any projects unless 1.) I have the time, and 2.) I'm in the mood. Lately, I had been at a loss for both! Ha! So, I am calling these "Winter" crafts. It still works.

Once Christmas was over, our choir Christmas concert was over (as well as all the lengthy rehearsals), things in general were back to normal, and the house was clean, I got to work. And, oh how I loved it! There's nothing like a good release, just something else to focus on, that's fun & requires little to no thinking.

These projects made me wish I would have gotten a little craftier before Christmas. I felt like I was making up for lost time though, so it's ok. Zach told me a while back that our guest room looks like Martha Stewart's storage room. Sad, but true. I have been piling up things, but they're all cheap & within reason, so it's not that bad. All I know is that I'm having so much fun with it, and getting to decorate the house with all of my creations. I enjoy looking at them so much, so that's worth it.

This one has to be my favorite so far...

-Iced Branches-

Pinned Image
From save-on-crafts.com

I basically went by the instructions. I got the Colorfill diamond vase filler at Michael's. This was the only place I could find it. I went out into the yard & gathered up my sticks & branches,
then brought them inside.

I used Mod Podge as my glue, but you could use just about any kind of craft glue. I brushed it on the branches, then sprinkled the crystals on. I would rather sprinkle than roll it up. I didn't want to break any of the branches.

It did get a little messy...


...but, it was worth it!

Voila!


More detail...


Full table view...


Zach said he thinks I need more branches, so I may create more later. I just love the wintry look of these on our table!

-Glitter Branches-

I have seen these many places, but couldn't really find a Pinterest link for them. I knew that I wanted to try making these myself, since they are insanely expensive at a craft store. So, I started with gathering even more branches from our yard
(Zach probably thought I was an idiot). :)

I then bought both glitter glue & glitter shakers at the Dollar Tree.


I got my branches, laid them out, and brushed Mod Podge on them. Yet again, you could use any kind of glue. I then sprinkled the glitter all over. Instant loveliness!

I also tried the glitter glue, but wasn't as impressed. The sprinkle glitter was a lot brighter than the glitter glue. It was difficult to make a good pic of these, but you get the idea. I only made this one (It took a good bit of time)...
...I think I'll save the rest for next Christmas.


-Glass Apothecary-

I have also seen these on Pinterest, but this lovely pic is from a blog I frequent, In My Own Style.


These are simple, but beautiful, and SO cheap to create. I made my own glass apothecaries a while back, simply using dollar & thrift store vases & candlesticks. You can see that post here.

This Christmas, I used two on my dining room table, holding ornaments, and one in the bathroom for greenery & pinecones.


I added these to my collection this year. They were in my grandmother's house, just sitting there, so lonely. So, I grabbed them up, and am loving them in their new home!


Then after Christmas, I replaced the greenery & pinecones with my new iced branches & diamond filler for the dining table.
That pic is above, but I'll include a smaller version here...


What did we ever do before Pinterest??

Hope everyone is doing well! We will be starting on our packing tonight (woohoo!), so we are pumped to say the least! It's nice that we will only be packing Summer clothes, so we can start packing any time this week. I CANNOT wait to have a full week of relaxation. The only time we'll have to keep up with is when to go out to dinner. No alarm clocks- no work. My only goal for the week is to start & finish my new book, Water for Elephants. Sounds tough, huh?

Now, if we can only hang in there until we leave. :)

Scrabble Dabble


I am not only posting one, but TWO posts today. I am coming off of a really productive weekend (well, one day of actual productiveness if you want to get technical), so I'm really excited. Also, our vacay is coming up next week, so that just adds to the excitement!! In my next post, I'm going to share a couple of little Pinterest-inspired projects I finished up this weekend. I also almost finished my biggie project (that I started back in July), and I will post on that hopefully later this week.
I just have the top coat to go!

This is yet another idea from Pinterest that sparked my creativity. I have seen this once before, but when I saw it on Pinterest a while back, I knew I wanted to create one. I had just recently brought home an old, OLD Scrabble game from my grandmother's house. I wanted to keep it, because we used to play together when I would spend the night at her house.
We would always play Scrabble & dominoes. :)

I gathered the letters I needed & played around
with their arrangement...


Zach & I picked our favorite, which was the second one, with a little alteration. I then found a piece of cardboard backing, and started placing them. Easy enough. Next, I grabbed the hot glue gun and glued them all down in place.


I had a thrift store frame that I had spray painted red & distressed once before, and it was the perfect look for this. Here is the finished product & the frame at its new home on a shelf...


It doesn't get much simpler than that!
Related Posts Plugin for WordPress, Blogger...