Wednesday, January 25, 2012

Rooster Table Re-Do


Ok, just a little preface before we get started. First of all, I was almost about to title this post Cocka-Doodle-DON'T, but I didn't. That may be too cheesy, even for me. Also, this is sad, but I admit- this table revamp began as a "No Spend July" project- the date on this post's draft is 7/5/11. Isn't that sad?? I first sanded & painted it (the hard parts), then it sat, and sat, and sat, and I didn't touch it for months. Until just this weekend (which was one of the most productive weekends ever!), and it only took a few minutes to finish.
Oh well, now that that's out of the way... :)

I am so excited about the way this table turned out that I am going to commit a cardinal sin & post my After picture first off.
I can't wait any longer!


Oh, I love it!! Now, for the details...

If you do love roosters, I apologize in advance. They just don't go with the design in our house.

Oh, me. This ugly little rooster table...

BEFORE


...was purchased at a resale shop in Birmingham. I was desperate for a small table to place a plant on that had nowhere else to go.
I knew the plant would cover up the lovely rooster, so I didn't worry about it. I loved the design around the edge, which is the only part that shows. But, now that I've gotten more into painting, I thought this would be the perfect, cheap piece to practice on.
If I ruined it...well, it couldn't get much worse.

I waited a while at first, because it was WAY too hot outside to spray paint. (As I said before, this was another No-Spend July project that I'm just now getting around to finishing.) I also had some stencils that I wanted to use on something. This was finally the project for them, and I LOVE how it turned out!!

AFTER (in steps)

I started by sanding away. The poor little rooster became a faint picture in a hurry. Yay!


Then, I spray painted it with red paint (cheap-o from Dollar General) all over the smoothed surface. This shows it after just one coat:


I didn't bother to cover the legs before I painted- I sanded them off after painting, and they looked just as before, with a little red mixed in to tie the color of the legs & table together. I then sanded over the tabletop a little to smoothe it out even more, then sprayed one more coat of the pretty red.


(The above pic shows it on a different day than the previous one, so the bright sun makes the red look differently.)

*Sidenote: After this step, I brought the table back inside the house and stupidly placed the plant back on it until I could get around to the stenciling. A few days later when I was ready to stencil, I picked up the plant and noticed the grooves on the bottom of the pot had made indentions on the painted tabletop. Ugh!! I can't explain how frustrated I was. I took the table back outside, sanded & painted again, but it never looked the same after that. The surface is still uneven, which kills my perfectionist self, but I got over it. I have to let go of that when I paint. No one will ever notice details like that but me. So, this time, I got over it and just began the next step... after a few months had passed, that is. :)

After bringing the table back inside, it did sit for many months- July to January, to be exact. I guess I just wasn't in the mood to finish it up. Weird how one day month you can be excited about a project, then the next, you just lose interest. Anyway, it's done now, and that's what matters...

I sanded the top again, just to make a better surface for the acrylic paint. Next, I used the stencils. I taped them along the edges, and used brown acrylic paint to paint inside the stencils. I love the center design so much, I don't want to cover it back up with the plant. I guess we're back to square one now, trying to find a new home for the plant. Ha!

Here are some photos of the steps. Some look a little rough, but they were all steps to get to the finished product.

First coat with stencil...


Second coats with center stencil & edge stencil...


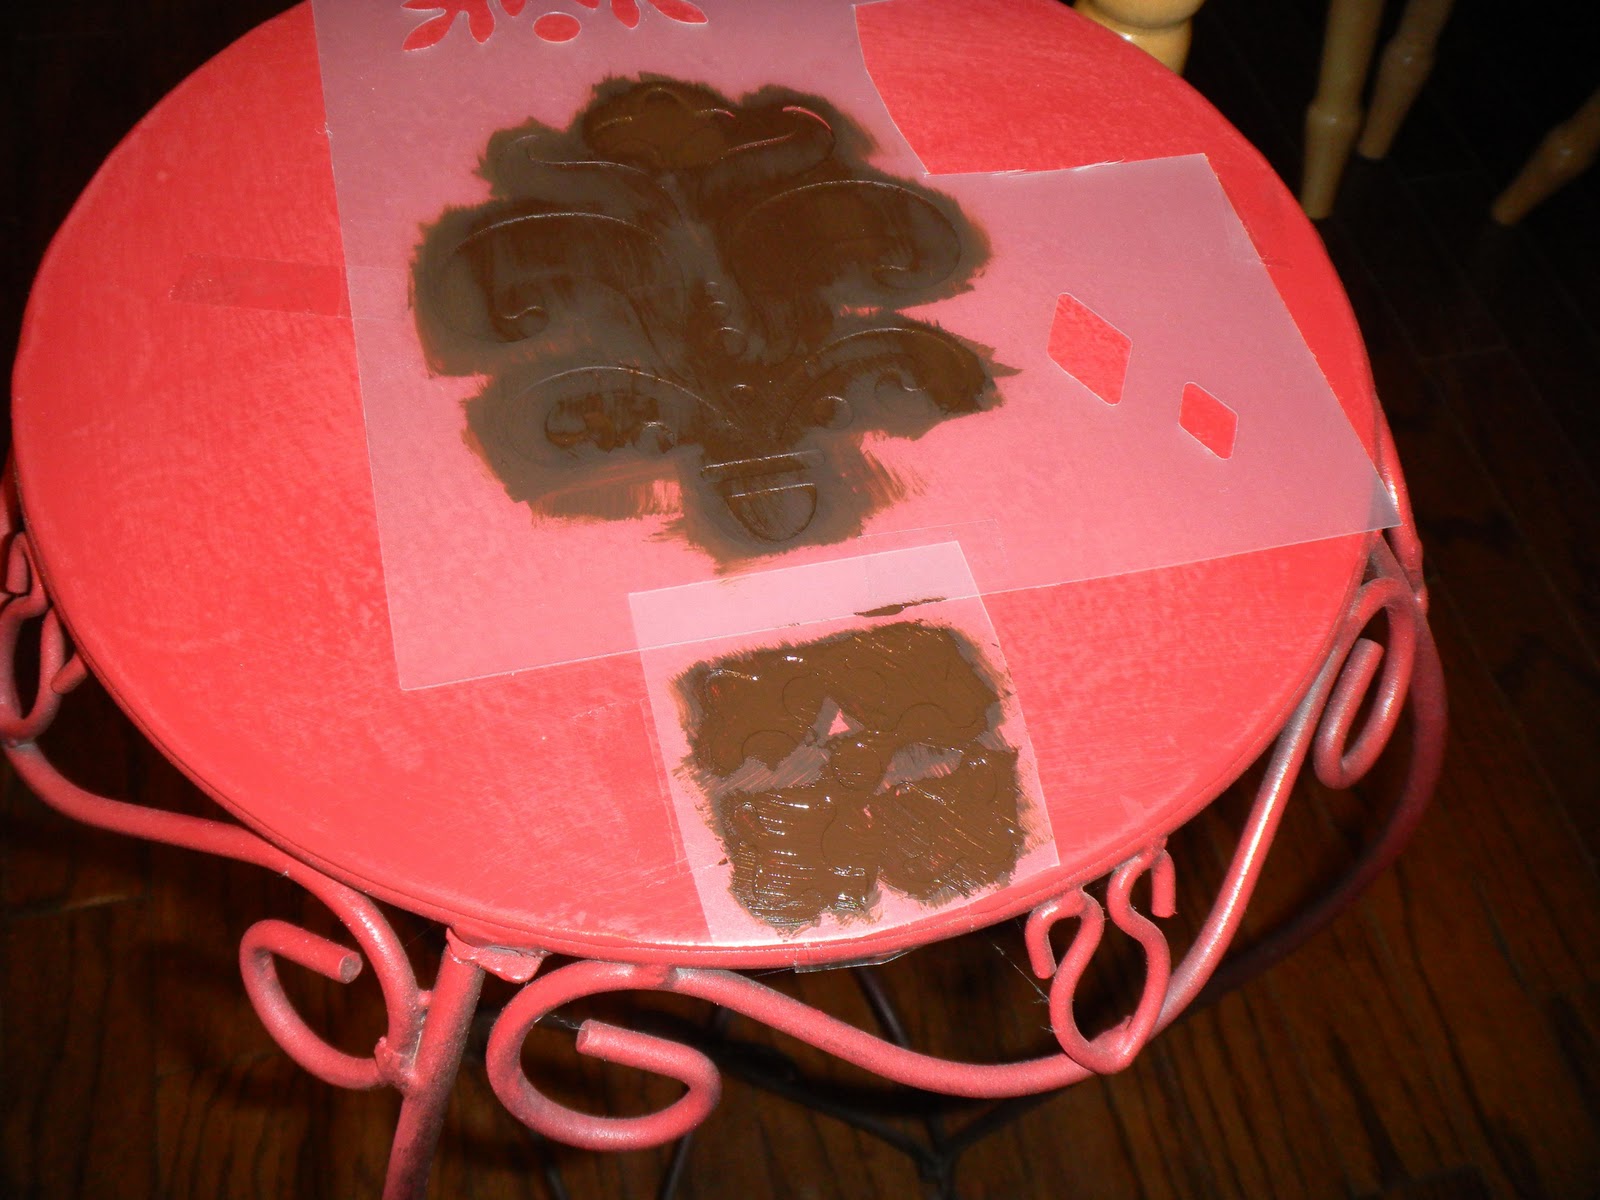
Working my way around with the stencils & two coats on each...
I know the red looks rough since I sanded it, but no worries- it turned out beautifully!


This shows the first coat of Mod Podge drying, while I sanded some of the red paint off of the legs.


I posted this pic in black & white, because it better shows the coverage of the Mod Podge. This is just after the first coat. I did a few more after this one, just for good measure.


Here's a close-up shot of the detail...


I did several top coats of Mod Podge, because I knew I would have a plant (with water) on top of this table. I wanted lots of protection for this baby. The only thing I may change is sanding the legs a bit more. Other than that, I'm so happy about my second time ever to paint furniture! (You can see my first here.)

So, a quick Before & After for the lazies who don't want to keep scrolling back & forth (myself included):

BEFORE


AFTER


Bye-bye, birdy! :)

Linking this up to...


...and many others!

Tuesday, January 24, 2012

"Pinspirations"- Winter Edition


So, I have been hooked on Pinterest for a while now. I love it at any time, but I especially loved it during the Christmas season. I have gathered so many crafty ideas from it. It is such an easy way to share, and I love having a visual on everything. Here, I'm going to share with you three little ideas from Pinterest that I tried.
If you like one, pass it along. It's so fun to share these ideas!

It was a little late at the time I started some of my Christmas crafts, but that's how it is around our house. I don't work on any projects unless 1.) I have the time, and 2.) I'm in the mood. Lately, I had been at a loss for both! Ha! So, I am calling these "Winter" crafts. It still works.

Once Christmas was over, our choir Christmas concert was over (as well as all the lengthy rehearsals), things in general were back to normal, and the house was clean, I got to work. And, oh how I loved it! There's nothing like a good release, just something else to focus on, that's fun & requires little to no thinking.

These projects made me wish I would have gotten a little craftier before Christmas. I felt like I was making up for lost time though, so it's ok. Zach told me a while back that our guest room looks like Martha Stewart's storage room. Sad, but true. I have been piling up things, but they're all cheap & within reason, so it's not that bad. All I know is that I'm having so much fun with it, and getting to decorate the house with all of my creations. I enjoy looking at them so much, so that's worth it.

This one has to be my favorite so far...

-Iced Branches-

Pinned Image
From save-on-crafts.com

I basically went by the instructions. I got the Colorfill diamond vase filler at Michael's. This was the only place I could find it. I went out into the yard & gathered up my sticks & branches,
then brought them inside.

I used Mod Podge as my glue, but you could use just about any kind of craft glue. I brushed it on the branches, then sprinkled the crystals on. I would rather sprinkle than roll it up. I didn't want to break any of the branches.

It did get a little messy...


...but, it was worth it!

Voila!


More detail...


Full table view...


Zach said he thinks I need more branches, so I may create more later. I just love the wintry look of these on our table!

-Glitter Branches-

I have seen these many places, but couldn't really find a Pinterest link for them. I knew that I wanted to try making these myself, since they are insanely expensive at a craft store. So, I started with gathering even more branches from our yard
(Zach probably thought I was an idiot). :)

I then bought both glitter glue & glitter shakers at the Dollar Tree.


I got my branches, laid them out, and brushed Mod Podge on them. Yet again, you could use any kind of glue. I then sprinkled the glitter all over. Instant loveliness!

I also tried the glitter glue, but wasn't as impressed. The sprinkle glitter was a lot brighter than the glitter glue. It was difficult to make a good pic of these, but you get the idea. I only made this one (It took a good bit of time)...
...I think I'll save the rest for next Christmas.


-Glass Apothecary-

I have also seen these on Pinterest, but this lovely pic is from a blog I frequent, In My Own Style.


These are simple, but beautiful, and SO cheap to create. I made my own glass apothecaries a while back, simply using dollar & thrift store vases & candlesticks. You can see that post here.

This Christmas, I used two on my dining room table, holding ornaments, and one in the bathroom for greenery & pinecones.


I added these to my collection this year. They were in my grandmother's house, just sitting there, so lonely. So, I grabbed them up, and am loving them in their new home!


Then after Christmas, I replaced the greenery & pinecones with my new iced branches & diamond filler for the dining table.
That pic is above, but I'll include a smaller version here...


What did we ever do before Pinterest??

Hope everyone is doing well! We will be starting on our packing tonight (woohoo!), so we are pumped to say the least! It's nice that we will only be packing Summer clothes, so we can start packing any time this week. I CANNOT wait to have a full week of relaxation. The only time we'll have to keep up with is when to go out to dinner. No alarm clocks- no work. My only goal for the week is to start & finish my new book, Water for Elephants. Sounds tough, huh?

Now, if we can only hang in there until we leave. :)

Scrabble Dabble


I am not only posting one, but TWO posts today. I am coming off of a really productive weekend (well, one day of actual productiveness if you want to get technical), so I'm really excited. Also, our vacay is coming up next week, so that just adds to the excitement!! In my next post, I'm going to share a couple of little Pinterest-inspired projects I finished up this weekend. I also almost finished my biggie project (that I started back in July), and I will post on that hopefully later this week.
I just have the top coat to go!

This is yet another idea from Pinterest that sparked my creativity. I have seen this once before, but when I saw it on Pinterest a while back, I knew I wanted to create one. I had just recently brought home an old, OLD Scrabble game from my grandmother's house. I wanted to keep it, because we used to play together when I would spend the night at her house.
We would always play Scrabble & dominoes. :)

I gathered the letters I needed & played around
with their arrangement...


Zach & I picked our favorite, which was the second one, with a little alteration. I then found a piece of cardboard backing, and started placing them. Easy enough. Next, I grabbed the hot glue gun and glued them all down in place.


I had a thrift store frame that I had spray painted red & distressed once before, and it was the perfect look for this. Here is the finished product & the frame at its new home on a shelf...


It doesn't get much simpler than that!

Tuesday, January 17, 2012

Caramelized Onion Dip


I am adding something to my New Year's Goals list- organizing this blog! I am going through my (many) drafts that were started a long time ago, and either finishing them up or hitting the Delete button. It already feels great! So, here's one of those older posts that have just been waiting on me to hit the Publish button.

This is a yummy recipe that I tried a while back. I don't remember where I found it, but I didn't come up with it on my own. I am a big fan of french onion dip, and this is just about as close to it as you can get with a homemade onion dip.

Ingredients:
  • 2 tablespoons butter (calls for unsalted, but I used salted anyway)
  • 2 medium onions, thinly sliced (I recommended chopping them though)
  • salt & black pepper
  • One 8 oz. bar cream cheese, at room temp.
  • 1 cup sour cream
  • 2 tablespoons chopped fresh chives
  • chips, thick-cut veggie chips, for serving
Directions:

1. Melt the butter in a large skillet over medium-low heat. Add the onions and 1/2 teaspoon salt and cook, stirring occassionally, until deep golden brown, 30 to 35 minutes. Remove from heat and let cool.

2. In a medium bowl, mix together the onions, cream cheese, sour cream, chives, 1/4 teaspoon sal, and 1/8 teaspoon pepper. Serve with chips.

Step 1: Cooking the butter, salt & onions...


Getting golden brown...


Step 2: Mixing it up...


Use thick-cut chips or vegetable sticks, and you're good to go! Yum!!

Hopefully some project posts are coming soon!
I plan on working on one tonight!

Monday, January 16, 2012

ABCs of Me


Just a quick update before my little post. We had a really good weekend! We headed to Cnooga to Zach's mom's for my birthday lunch. It was really nice, and we had fun visiting with the fam. Then, me & my sweetie shopped a little, then went to the movies to see Beauty & the Beast. I had forgotten how good that movie is! It was even better in 3D. And I cried like a little girl, even knowing exactly how the story went. :) Then, on Sunday, we had church that morning then a yummy lunch at Tiger's Inn. We rested most of the afternoon- all I accomplished was the laundry. Restful Sunday afternoons will soon be no more though, because kids' choir rehearsal starts back next week.
So, I enjoyed this one to the fullest.

A few other things that have been going on... Something weird has come over me. Lately, I have been wanting to start running. I don't know if it's just part of my goals for the new year (which I do want to be healthier & exercise more), but "I just felt like running"... Please tell me you read that in a Forrest Gump voice. (If not, it may just be me, Zach & my little brother who have movie lines memorized & quote them in every day conversation).

I got some new tennis shoes for Christmas, so that may also be part of it too. Anyway, I woke up rather early on Saturday morning, and just had the drive to get up & get out. I bundled up (it was a little chilly), and ran around our neighborhood. I did take a few breaks & walk in between. It felt great!! I had more energy all throughout the day. Then, on Sunday afternoon, Zach & I walked around our neighborhood with the doggies.
I'm hoping we'll keep up this routine.

Another new thing that happened this week- I got shellacked. My mom got me a gift certificate to get my nails done for my b-day. Needless to say, it didn't stay with me too long, because I got them done at the beginning of last week. I picked out a pretty red color, and had the shellac painted on. I love that it's my actual nails, and the shellac keeps them so strong! I am afraid this is going to be a new vice of mine, because I can't get over how great they turned out. My nails have been put through the ringer over the last week too, and the color will NOT wear off and has not shown any marks or dents. They are still just as shiny as they were when they were done. I highly recommend this- just as a treat to yourself, and it's cheaper than getting a full set of nails.


So, on to my post. I know this is one of those time-wasting filler posts, but I love doing these things if I have spare time. I hope to get my butt into gear this week & start/finish not one, but two, projects. We'll see how that goes...

ABC's of ME

A. Age – Just turned 27

B. Bed size – King-sized Tempurpedic, and there's nothing better!

C. Chore that you hate – Hand-washing dishes! Ugh!

D. Dogs – My Daisy girl (Jack Russell Terrier) & my Cosmo (Border Collie)

E. Essential start to your day – Stretching right before I get out of bed, brushing teeth

F. Favorite color – Royal blue, but I also love the color combo of black & white (can't get enough of it, actually)

G. Gold or silver – Silver or white gold

H. Height –5’1

I. Instruments you play – Piano

J. Job title – Associate Agent, Nationwide Insurance

K. Kids – None yet, just our doggies. Oh, and look- I just happen to have some recent pics of them, like any good mommy should... :)


L. Live – Alabama- Roll Tide!!!

M. Mother’s name – Jeanie

N. Nicknames – Ash

O. Overnight hospital stays – Thankfully, none at all. Hopefully my only one(s) will be when a little one enters our world.

P. Pet peeves – Oh goodness! Do you have all day? I can't stand selfishness, people that brag about everything and/or are a "Me Monster", i.e. always talking about themselves. Don't care to be around people like that.

Q. Quote from a movie –"You're a beautiful woman, you deserve a beautiful life. That's all there is to it." -Jacob, Water for Elephants. LOVE this movie!!

R. Right or left-handed – Right-handed

S. Siblings – Little brother, Jonathan (who's not so little anymore at almost 23)

T. Time it takes you to get ready – Oh me, about an hour if I'm doing my hair; about 45 minutes if not. Sad, I know.

U. Unbelieveable Thing About You-  I have never had a broken bone. (Knock on wood.)

V. Vegetable you hate – Brussel sprouts & hominy is about it. Other than that, I love my veggies!

W. What makes you run late – Oversleeping, choosing my outfits or a bad hair day

X. X-rays you’ve had – Only on my chest when I had pneumonia. Yuck!

Y. Yummy food you make – I'm the green bean queen of my family! Ha! I also love hashbrown casserole- it's yummy & easy- and my ranch potatoes. My husband's specialty though- fried rice!!

Z. Zoo animal – Monkeys are so fun to watch!

Tuesday, January 10, 2012

More Christmas Pics- '11


On Christmas night after we got home, we hurried & took a few pics of our little family in front of our tree. I know it's a little late, but I had to post these last few Christmas pics,
because I love them so much!

Me & my sweets


My squinty little eyes, which means I'm a happy girl :) ...


Mommy & Daisy girl


Our beautiful tree


We also took a couple shots of all four of us, but those didn't turn out. Now we know similar to what it feels like when you're trying to make a family photo with kids who don't want to cooperate. It is a rarity that you have a decent pic with all family members looking at the camera, and we just didn't achieve that
this time around. Oh well, maybe next time.

My 27th Birthday Weekend! Roll Tide Roll!!!


Can I get a big "Roll Tide"?! What better birthday gift could I receive than a 14th National Championship win?!
ROLL TIDE ROLL!!!

Needless to say, last night's game was awesome, and Zach & I are still on cloud nine...and also a little sleepy. I have never been more proud to be an Alabama fan. The city of Tuscaloosa needed this more than anything, with all they have been through this year. I am so glad our team is bringing the trophy back to UA where it belongs!

With today being one year since my dad passed away, the win is still a little bittersweet. I know he was watching though.

As for this weekend, I was bound & determined to make this a great birthday!! I skipped our church's women's retreat (which is always that weekend), and spent the whole weekend with family instead, doing what we wanted to do. Isn't that how a birthday, or birthday weekend in my case, should be spent?

On Friday night, Mom cooked dinner for all of us at her house. By all of us, I mean her, me & Zach, Jonathan & his new girlfriend Chelsea, and my Pop & Mamaw Helen. Pop's birthday is the 7th, so we always celebrate ours together. He is now 81, and still has more energy than I do- unbelievable! Dinner was wonderful, and we had a Nancy cake & coffee for dessert (Nancy is our favorite cake baker- she made our wedding cakes & all of our b-day cakes growing up). It was such a great time spent with family,
telling stories & laughing!

Our cake...


The three birthday kids...


Pop...


Then, Saturday was my day. Me, Zach & Mom went to Birmingham to eat at... (if you know me at all, you know exactly where we ate)... STIX! I filled up on sushi, fried rice & scallops. YUM! It is my absolute favorite place to go! We got in a little shopping while there, and really had an awesome day. My sweetie decided this year that he would give me a set limit & let me shop as his present. This is the perfect present for me, by the way! I got some new black heels (which were actually much-needed). Then, I spoiled myself & got a Coach camera case. (I think I was just jealous that Mom had gotten a purse, so I had to get something there.) :)

On Sunday, we took the day off. We rested, and it felt great. I straightened up the house some & did laundry, throughout the day at my leisure. We watched a lot of TV & a movie.
The relaxation was great.

Monday was my actual b-day, so I worked that day. I did, however, wear my Bama attire. My sister- & brother-in-law got me a cute houndstooth scarf with my initials monogrammed on it for Christmas, so I wore that proudly!


My mom switched her lunch so she could go with me.
Her, Jonathan & Zach all took me to lunch, and that was such a nice treat. After work, I headed home, and Zach & I took off to his dad's to watch the game.
The rest is history. :)

As I said before, one year ago today was the worst day of my life when I lost my dad. But, life is still good, and we are still here. I hope to make the most of it.
Thank you all for lifting me up over the last year.

And Roll Tide, Dad!!
Related Posts Plugin for WordPress, Blogger...